
7 DIY Holiday Decorations For Your Home
The holiday season is a time for warmth, joy, and spreading cheer. One way to make your home feel even more special during this time is by decorating it with DIY holiday decorations.
These homemade touches not only add a personal flair to your space but also provide a sense of accomplishment. So, roll up your sleeves, gather your crafting supplies, and let's explore 7 delightful DIY holiday decoration ideas to brighten up your home.
1. Homemade Christmas wreath
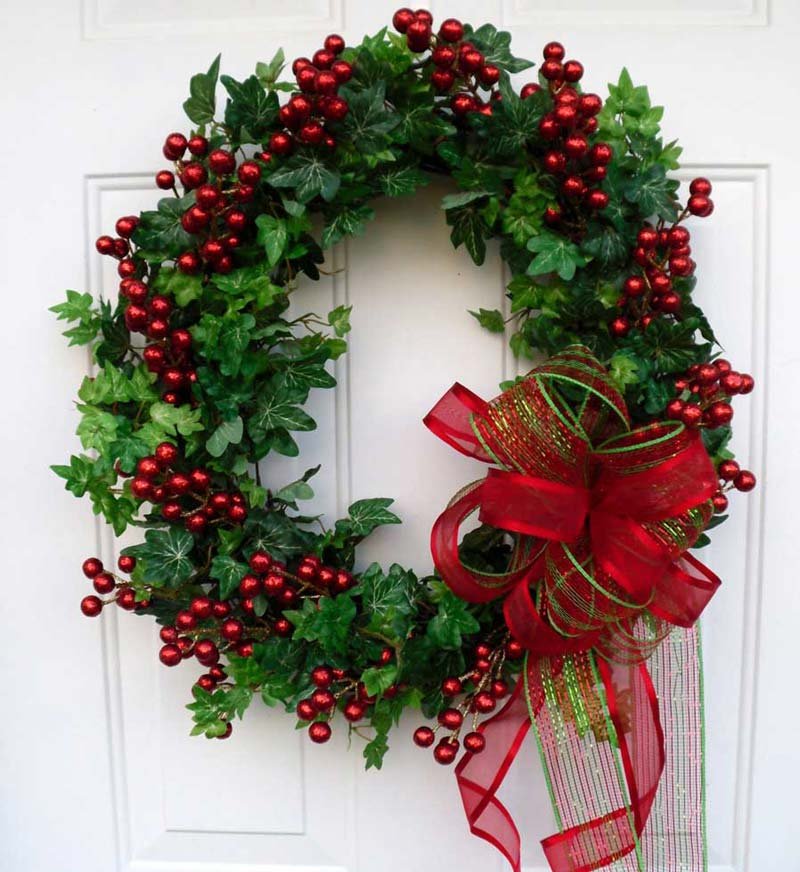
Credit: https://www.quiet-corner.com/
Creating a homemade Christmas wreath is a wonderful way to add a personal touch to your holiday decorations. You can design a wreath that matches your home's decor, and it's a fun DIY project to get into the festive spirit.
For this you’ll need,
Wreath Base: You can use a foam wreath base, a wire wreath frame, or even make your own by bending a wire coat hanger into a circle.
Greenery: Gather artificial or real greenery like pine branches, cedar, holly, or eucalyptus. If you're using real greenery, make sure to keep it fresh by spritzing it with water.
Floral Wire: This will be used to secure the greenery to the wreath base.
Decorative Elements: You can add pine cones, berries, ornaments, ribbon, or any other decorative items you like.
Scissors or Pruners: To trim and cut the greenery.
Hot Glue Gun (optional): For attaching small items or securing loose ends
Firstly, prepare your greenery by trimming it into smaller sections. Attach the greenery to the wreath base using floral wire, overlapping branches to cover the entire base evenly. Add decorative elements, such as ornaments and pine cones, using hot glue or floral wire. Optionally, create and attach a bow. Hang the wreath with a piece of ribbon or twine as a hanger. You can also add extra embellishments like glitter or LED lights for a festive touch. Enjoy your beautifully crafted homemade Christmas wreath!
2. Unique String DIY Christmas Tree

Credit: https://www.seattlestagedtosell.com/
Creating a string Christmas tree is a charming and cost-effective DIY decoration for the holiday season. This project allows you to make a unique, personalized Christmas tree using string, twine, or yarn.
The Materials You'll Need are:
Styrofoam or cardboard cone: This will serve as the base of your tree.
String, twine, or yarn: Choose a color that matches your holiday decor theme.
Craft glue or a glue gun: To attach the string to the cone.
Decorative items: Small ornaments, ribbon, beads, or any other decorations you want to add.
Now getting started with the preparation, Gather all your materials and set up your workspace. Make sure you have enough string or yarn to cover the entire cone.
Start by attaching the end of the string to the top of the cone using craft glue or a glue gun. This will be the top of your tree. Begin wrapping the string around the cone, working your way down. You can wrap it tightly for a dense look or leave some gaps for a more textured appearance. Continue until you reach the bottom of the cone. Once you've covered the entire cone with string, use glue to secure the end in place at the bottom of the cone. Now it's time to decorate your string Christmas tree. You can glue on small ornaments, tie ribbon around the tree, or attach beads for extra sparkle. Get creative with your choices and placement.
Lastly, Allow your tree to dry completely. This might take some time, so be patient.
Once your string Christmas tree is dry and your decorations are in place, it's ready to be displayed. You can place it on a table, mantel, or even hang it from the ceiling as a festive ornament.
3. Upgrade old Baubles

Credit: https://www.bangonstyleblog.com/
Upgrading old baubles, or ornaments, is a fantastic DIY decoration project that not only breathes new life into your old holiday decor but also allows you to express your creativity.
The Materials You'll Need are,
Old Baubles: Gather your old ornaments that you'd like to upgrade. They can be glass, plastic, or any material.
Craft Supplies: Depending on your chosen upgrade method, you may need items such as acrylic paint, spray paint, glitter, ribbon, beads, hot glue gun, or decoupage glue.
Decorative Materials: Consider materials for embellishments, such as rhinestones, sequins, or artificial snow.
Start by cleaning your old baubles to remove any dust or residue and then decide on how you want to upgrade your baubles. You can either repaint your baubles with acrylic paint to match your new décor, or for an even more professional look; you can choose spray paint. Get more creative and apply a layer of Mod Podge to your baubles and then sprinkle glitter on them for a sparkling effect.
Depending on your chosen upgrade method, you can further decorate your baubles with rhinestones, sequins, beads, or artificial snow. Use a hot glue gun to attach these elements securely.
4. Cinnamon stick Candle Holders

Credit: https://gardentherapy.ca/
Cinnamon stick candle holders not only make for lovely holiday decorations but also make great gifts for friends and family
These candle holders make for charming centerpieces or decorations and provide a subtle, sweet, and natural cinnamon aroma that will enhance the holiday ambiance in your home.
For this you'll Need:
Cinnamon Sticks: Purchase enough cinnamon sticks to wrap around your chosen candle holder or glass container. You can find cinnamon sticks in craft stores or online.
Glass Candle Holder: Select a glass container that is suitable for holding a candle. It can be a simple glass jar, a votive holder, or a larger hurricane vase, depending on your preference.
Candle: Choose a candle that fits your glass container and complements the overall look.
Decorative Items (Optional): You can use items like twine, ribbon, or small embellishments to add extra charm to your candle holders.
Hot Glue Gun and Glue Sticks: These will be used to attach the cinnamon sticks to the glass container.
To start off, Gather all the materials you'll need for the project. Ensure your glass container is clean and dry. After measuring the height of the cinnamon sticks to that of the glass container, apply hot glue to the cinnamon sticks and press it onto the glass container. Continue this process, attaching each cinnamon stick next to the previous one until the entire container is covered.
If you want to add a decorative touch, tie a ribbon or twine around the cinnamon sticks to secure them and create a rustic, festive look.
5. Hanging Snowflakes

Credit: https://www.thecraftedsparrow.com/
Create a snow flurry inside your home! This is a wonderful way to add a touch of winter wonder to your home during the holiday season. These snowflakes can be made from various materials, and they can be hung from your ceiling, windows, or anywhere you desire.
For this you’ll need,
White Paper: You can use plain white printer paper, cardstock, or any white paper of your choice.
Scissors: Sharp scissors are essential for cutting intricate snowflake designs.
Hole Punch and String: If you want to hang your snowflakes, you'll need a hole punch and string or ribbon.
Decorative Items (Optional): You can add extra embellishments like glitter, sequins, or beads to your snowflakes for a sparkling touch.
First and Foremost, gather all of your materials and create a comfortable workspace. Take a square piece of white paper and fold it diagonally to create a triangle.Fold the triangle in half again, creating a smaller triangle.Fold the smaller triangle in half once more. This will give you a smaller triangle with a folded side.Trim the excess paper, creating a square with a folded triangle on top.
Begin cutting small shapes and designs into the folded paper. Be creative! You can make triangles, circles, stars, and various patterns. Remember that the more you cut, the more intricate your snowflake will be.
If you want to embellish your snowflakes, add a touch of glitter, sequins or beads
To hang your snowflakes, punch a small hole at the top of your snowflake and thread a piece of string or ribbon through it. Hang your snowflakes from the ceiling, window frames, or wherever you desire to create a winter wonderland atmosphere in your home.
6. Sock snowman

Credit: https://thestitchingscientist.com/
This is perfect for those times when you’ve got a lone sock missing its match. It's one of the most fun and easy DIY project that requires only a few materials.
For this you’ll need,
White Socks: You'll need two white socks for the body and head of the snowman.
Rice or Polyfill: You can use rice to fill the sock snowman or polyfill stuffing, which is safer and non-perishable.
Rubber Bands or String: To secure the sock segments.
Decorative Items: Items like Buttons, ribbons or yarn, pom poms, can be used to create the snowman's eyes, nose and other details.
Fill one sock with rice or polyfill to create the body of the snowman. Leave some space at the top to create the head. Use a rubber band or string to secure the sock at the neck.
Now, fill the second sock with rice or polyfill to form the head. Secure the top with a rubber band or string, leaving some excess fabric to shape the snowman's hat.
Place the head on top of the body, ensuring the rubber band or string is hidden by the scarf or clothing.
Be more creative and add other decorative items such as scarf, eyes, nose.
7. Advent Calender
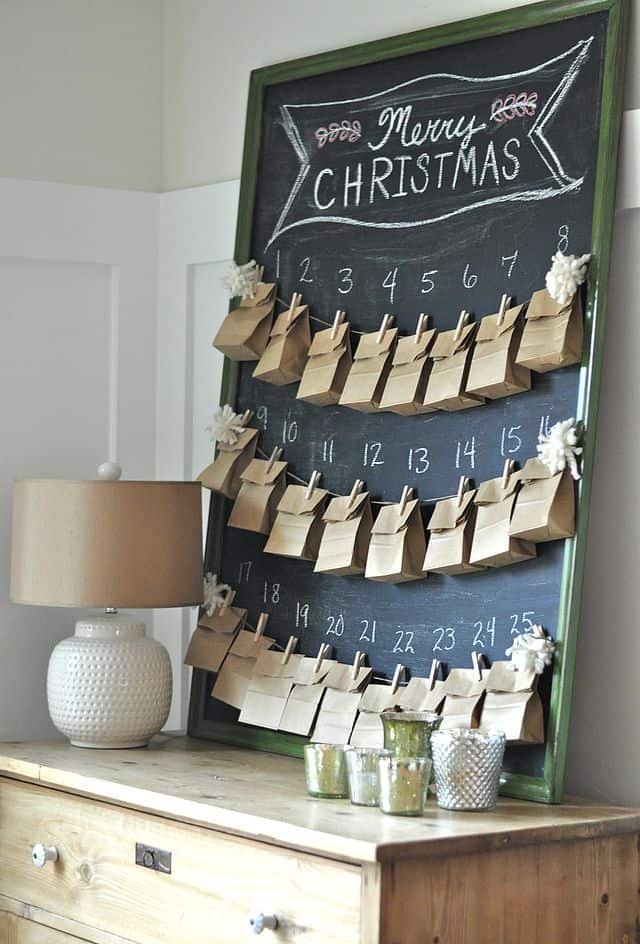
Credit: https://www.31daily.com/
Count down the days until Christmas with a wooden countdown sign and build anticipation and excitement. A small chalkboard lets you update the days every day for as long as you care to count. A bonus of this project is that it uses a lot of budget friendly items.
For this you’ll need:
24 small envelopes or boxes: You can use small paper envelopes, small boxes, or even craft your own using colorful paper.
Number stickers or markers: Use these to label each envelope or box with the days of December leading up to Christmas.
Decorative materials: Gather holiday-themed stickers, washi tape, ribbon, and any other decorations you like.
Small treats or notes: Fill each envelope or box with a small treat or a special holiday note for each day.
String, twine, or a hanging rod: This is to hang your envelopes or boxes in a row or as a tree shape.
Steps to Create Your DIY Advent Calendar:
Use your number stickers or markers to label each envelope or box from 1 to 24. Decorate them with holiday-themed stickers, washi tape, or any festive decorations you like. Place a small treat or a holiday note inside each envelope or box. You can include candy, chocolates, small toys, or messages with holiday activities, quotes, or special memories.
Arrange the envelopes or boxes in a row or shape that works for your space. You can hang them on a string or twine, attach them to a bulletin board, or even create a Christmas tree shape on a wall.
Enjoy crafting this holiday season! Make sure to share what you have created at tag us @twistgallery on Instagram!
Also Read: Event Space Toronto, wedding venue Toronto, Wedding Reception Toronto